A satisfying project providing new life to a Large Vintage Petrol Sprit Can.
At one of the last sales of 2025, I found a beaten, battered, and neglected steel Petrol can or Spirit can, dating from around the mid-20th century. These cans were produced in large numbers and used to transport and store all types of spirits and fuels.
These old cans were often multi-use and were overpainted and over-stencilled over many years, allowing them to be used for a wide variety of contents.
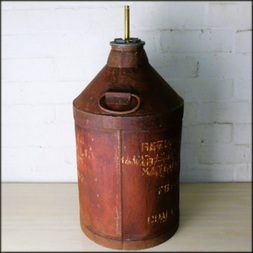
I bought this can in rainy conditions, and to be honest, the wetness disguised many of its issues. This great-looking old can was found with a grim appearance, but it definitely has potential. The can was found to be structurally sound, it sat straight and true and had its original cast alloy screw in lid. The can itself is made from heavy-gauge steel with reinforced joints and double-thickness seams.
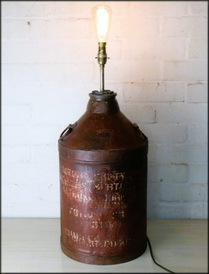
The can has multiple layers of red paint that have formed over many decades of use. These old paint layers have deteriorated over time and have flaked, but they have kept rust and corrosion at bay. Once I had dried the can out, I could see the possibilities of salvage and reuse for this piece of British industrial history.
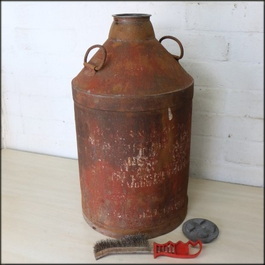
Here are some images of the old can as found.


At first glance, this old can may look like it is only fit for the local recycling centre; however, as with all projects like this, it is really worth looking below the surface and taking your time.
The first task was to check the inside of the can for any lingering smells of spirits or petrol, luckily, this can had no such issues and was dry and solvent-free. Then came the messy part, the can needed to have its loose paint and debris removed. It is a job that is messy and has no finesse. Basically, it needed scrubbing with a wire brush and cleaning with methylated spirits; this should be done ideally outside due to fumes from the methylated spirits.
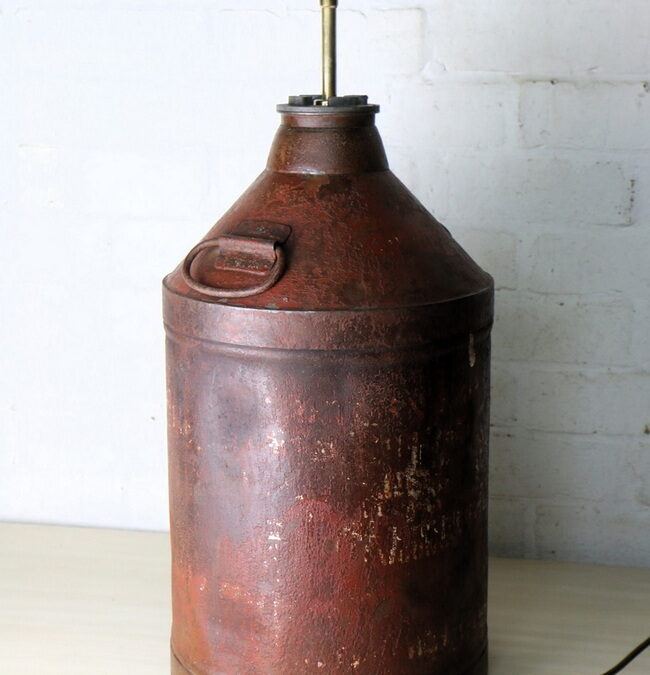
Here is the can after its initial cleaning, already the finish is massively improved, and the red colour is brighter. After the initial scrubbing and cleaning, I decided to give the can an initial coating of quality finishing wax to seal the can’s finish during handling and the next steps.

The next thing to do with a project like this is to figure out your wiring route.
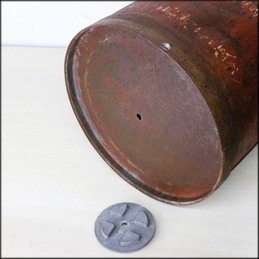
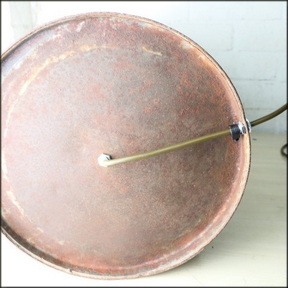
The round base of the can had a folded lip, which made it a good starting point for cable entry. I decided to route the wiring through this lip, then up through the centre of the can and finishing by exiting at the screw in alloy lid.
I drilled the three holes at 10mm Diameter to take a 10mm threaded tube; a 10mm all-thread tube is an industry standard. On a project with steel or any potentially sharp material, when these materials are drilled, it is essential to provide protection for the cable when fitted; sharp metal edges and live electrical cables do not mix well. I decided to use small sections of 10mm tubes with plastic grommets fitted at the cable entry and exit holes to make sure there were no future issues. At the top, I used a brass tube cover to raise the bulb holder mounting height and to give the lamp a brass finishing set-up that contrasts well against the finish of the can.
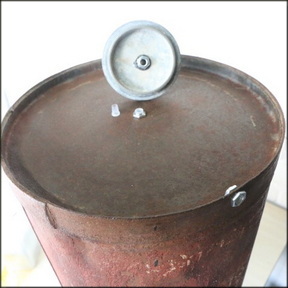
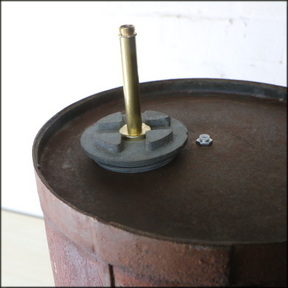
The small tubes and top hat grommets mean that the lamp’s new wiring was fully protected, and these small but important components are a large part of modern safety standards.
I fitted the parts and, before rewiring, took a look to see if the height and proportions of the new parts combined well.
Fitting the wiring and electrical components.
This interesting piece of industrial history will now need wiring and will need some modern fittings and components to make it into a usable and decorative lamp.
When restoring or making any lighting, there are several important safety points to remember.
- Always follow your local or national standards and only use components that meet your country’s regulations.
- In the UK, metal lighting such as this lamp needs to be earthed (grounded). Check the wiring standards in your country.
- Always smooth down and fit protective plastic or rubber grommets to areas, such as tubing, where your cable passes.
- Always fit a cable-stay, a point where the cable is fixed, that will stop the wiring from being pulled out of your bulb holder in the event of the cable being pulled or the lamp being dropped.
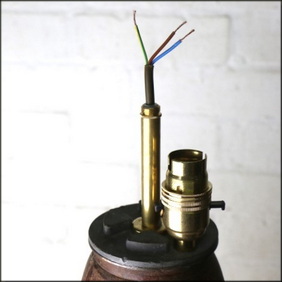
A Bulb holder was wired up and fitted into the lamp part. You will be able to see UK wiring here, which shows Green & Yellow for Earth, Blue for Neutral, and Brown for Live.
With the bulb holder fitted, this Antique lamp now meets modern safety standards.

Applying the final finish to the lamp.
Now that the lamp was wired, it was time to give the can a proper finish. The steel body was finished with three coats of quality wax called Bri Wax, one light brown and 2 clear. The final sealing coat of wax was Micro Crystalline finishing wax which is a fantastic product and brings out shine, textures and fine detail in the steel and finish of the old can, after waxing the multiple layers of paint and white stencilling adds great texture to the surface, the marks and dents in the can add to the industrial finish, these marks and irregularities show its life and its engineered construction should be applauded.

The finished lamp
With the revived finish complete, the original industrial design and shape of the petrol can started to shine and is now ready to be used for its new purpose of lighting a space.
In use and with a shade fitted the lamp comes to life, this handsome can lamp would make a great addition to any mancave, or a contemporary space that needs a touch of industrial chic and with its wide round base and stability, the restored vintage petrol can lamp base would make a good lighting option for a large welcome table in a café or restaurant.
Conclusion.
The skills of the original makers made this can well worth restoring, and it was a pleasure to give this piece of “scrap” new life. It was a straightforward job that took thinking time and a few hours’ work. It is great to think that the old petrol can will now live on. I am really happy with the result. I am delighted to have provided this interesting piece of industrial history with new life.
Materials – Earthed Wiring. Earthed switched Brass bulb holder. 10mm Tube, Nuts and Grommets. New Brass parts. Plastic cable stay. Wax, cleaning fluids and sundries.
Time Spent on the lamp – 4 Hours.
I often have several unique, Vintage and Industrial items for sale in my eBay shop here – Hertfordshire Lighting and Design
I would love to hear from anyone who has performed a similar refinishing project; it’s always great to share ideas with other people.
Even a simple restoration project can bring a great sense of satisfaction and is great fun. I would encourage anyone to bring new life to an old Antique or vintage item.
Remember –
Shop around.
- Find an item.
- Give it some thought.
- Do a bit of research.
- Restore.
- Antiques are Green!
You can read more of my restoration projects on this website such as this restoration and conversion of an Antique brass oil lamp base. HERE
If you have any questions or need advice on any item of Vintage lighting, please contact me, and I will do my best to help.
Michael Adkins. michael@hertfordshire-lighting.com