Converting A Vintage Corinthian Column Oil Lamp Base To A Modern Electric Traditional Table Lamp.
In this post, I am going to show you how to convert an Antique Corinthian Column oil lamp base into a modern, traditional table lamp without losing the lamp’s antique, vintage feel and appearance.
The lamp shown in this conversion project is a brass Corinthian column oil lamp base that dates from the early 20th century period.
This lamp base is made of Brass, parts are pressed, drawn, and cast. Being an oil lamp, it is essential that the base is wide and heavy; the weight is provided by a heavy cast steel under base.
Here are some images of the Antique Corinthian Column oil lamp base as found and in its original condition.


Assessing the original oil lamp base.
The brass is heavily tarnished and very unattractive, the base has been stored for many decades in unsuitable conditions, and the original lacquered finish to the brass has deteriorated and suffered from heavy finish tarnishing.

Dismantling the lamp base into its component parts.
The lamp base is held together by a solid threaded steel rod using an old British imperial thread. By loosening the nut under the base, we can reveal the parts and see what is needed to start the electric conversion.
The rebuilding of this lamp for electric use is fairly straightforward. I will be using a length of UK standard 10mm threaded tube to replace the original threaded rod and will drill one hole to the top brass section, allowing the 10mm threaded tube to pass through all the lamp components; luckily, the iron base already has a suitable-sized hole from the original manufacturer.

Improving the finish of the lamp.
As the brass parts have a lacquered finish, it is not possible to polish the brass without first removing the lacquer. For this, I use a quality paint stripper. I always buy my stripper from a car finishing outlet, as the paint stripper used in the motor industry is far superior to domestic versions.
PLEASE NOTE: These professional strength strippers are very strong, and you should always follow the manufacturer’s instructions and always wear gloves and eye protection.
The length of time it takes to remove old lacquers really depends on the original finish. On this lamp, the finish came off easily and with just one coat of stripper.
The fun part – Polishing the brass before rebuilding the lamp.
I always love polishing brass and metals that have been neglected. This is a satisfying job where your hard work and patience really pay dividends. Here are the parts after polishing. I used Autosol for this project; it is a quality polishing agent used in the motor trade.


Rebuilding the lamp.
Here are the parts used to rebuild the lamp base. Not too many new parts. I start at the steel base, securing the 10mm Threaded rod in place. This is the foundation for the remainder of the lamp. The lamp provisionally tightened and already well on its way to a state where it can start a new life as an electric table lamp.


Sizing the height of the lamp.
When the lamp is electrified and in use, I wanted to ensure that the star part, the beautifully cast Corinthian capital, was not lost when a shade was fitted. The height of the new bulb holder was raised using modern solid brass sections to ensure that the capital would be seen and shine in use.

Wiring the lamp.
I wanted to keep as much of the oil lamp history as I could, so I decided to use a specialist side entry tube mounted below the new bulb holder. This side entry tube avoids the need for drilling out the base and steel sub-base and emphasises the lamp’s history. I chose a covered silver cable to wire the lamp as it offered a good contrast to the polished brass, and makes it clear that this is a conversion of an Antique piece.
The new side entry brass tube also has a built-in cord grip feature, which is a standard requirement on new lamps. The cable in the UK is earthed or grounded, as it is known in some countries. When rewiring a lamp, make sure you follow your local guidelines, and if you are in any doubt, please make sure you get advice or input from a qualified person. On this lamp, I used a “safer” switched brass BC bulb holder; these have an extra safety feature, meaning they will not switch without a bulb in place.

Finishing polish and a piece of felt.
After the wiring is complete, I gave the brass a final polish and finished it with a new green felt base. This is a lovely finishing touch and is easy to do. I use hi tack spray glue as used in carpet fitting and material fittings. Green felt is widely available online and in craft shops.

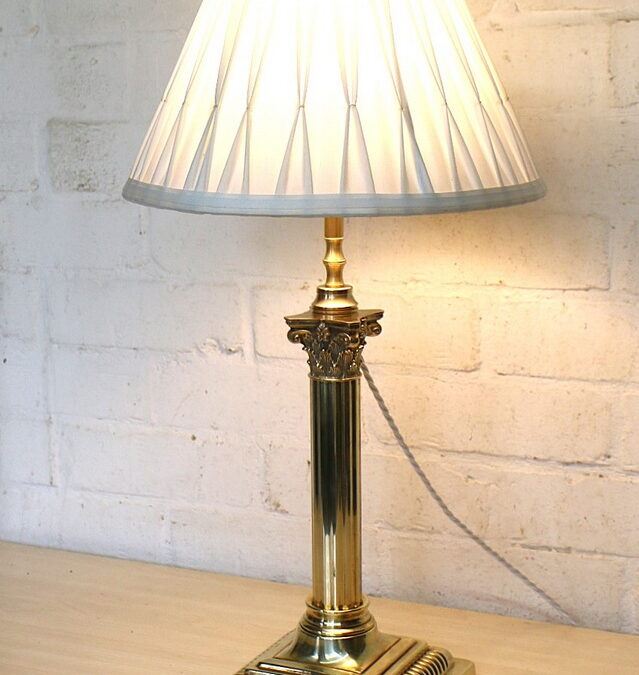
The finished and converted lamp.
In use, the lamp really shines; the extra mounting height of the bulb holder really allows the Corinthian capital to play its major part in the look of the great old lamp, and the polished brass shines. Of course, the brass will now tarnish with age if unpolished, but then again, some people prefer it like that!

Conclusion
This was a really enjoyable project and i am delighted with the end result, it is really satisfying to bring a quality old neglected item back to life, this lamp now has another 100 years service ahead of it.
Time spent: 4 Hours.
Parts.
10mm Standard threaded tube.
New silver cloth-covered three-core cable.
New Plug.
Brass sundries
Side entry tube.
New switched “safer” brass bulb holder.
I have a wide and varied range of Antique and Vintage lighting items for sale in my eBay shop here – Hertfordshire Lighting and Design
You can see another Antique Oil Lamp refurbishment by reading my post HERE
Another interesting conversion project can be read HERE
I would love to hear from anyone who has performed a similar refinishing project; it’s always great to share ideas with other people.
Even a simple restoration project can bring a great sense of satisfaction and is great fun. I would encourage anyone to bring new life to an old Antique item.
- Shop around.
- Find an item.
- Give it some thought.
- Do a bit of research.
- Restore.
- Antiques are Green!
If you have any questions or need advice on any item of Vintage lighting please contact me and I will do my best to help.
Michael Adkins. michael@hertfordshire-lighting.com