
Restoring and refurbishing an Antique Gilt Toleware ceiling light
In this post, I will share the story of an antique and neglected piece of European Toleware metal lighting.
Recently, I was lucky enough to obtain several Antique Tole fittings. “Toleware” is a generic term that refers to sheet metal items that have a painted or decorated finish. Early Tole items were generally made of Tin; however, sheet steel was also used later on due to it being a cheaper material with a better strength profile.
The fitting I am showing you in this post is of continental European origin, maybe Italy, Spain, but most probably of all, France. Most Vintage and Gilt Toleware lighting you see has an extravagant design; they are fancy, sometimes complex, and eye catching. Finishes vary from Gilt as shown here to hand-painted and sometimes japanned finishes.
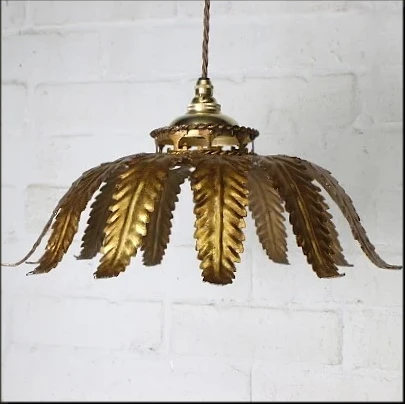
This fitting has a French Empire design, it is extravagant and finished in a brilliant Gilt Gold finish, it has 13 tapering and curved sheet steel leaves welded to an ornate and reticulated central gallery, the gallery has fine twisted rope borders, and it has been carefully made. Externally, the finish is bright and gold; internally, the finish is matte gold.
Here are images of the fitting as found and in its original, neglected condition.

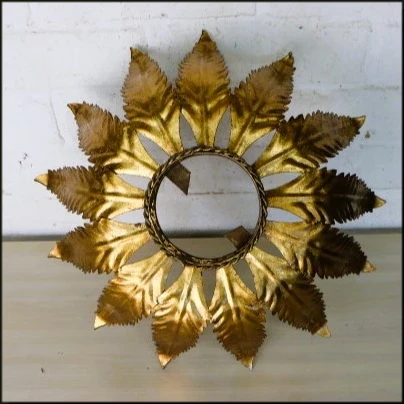
Assessing the condition of the light fitting.
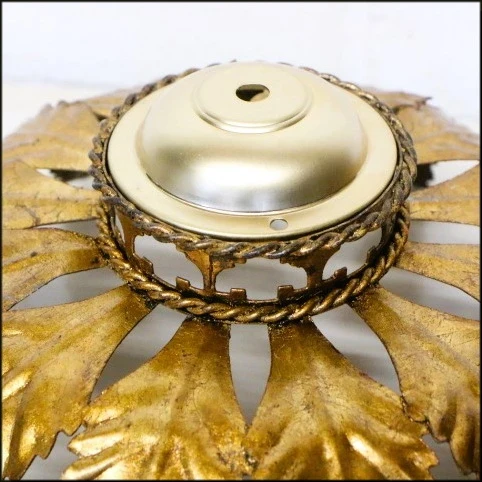
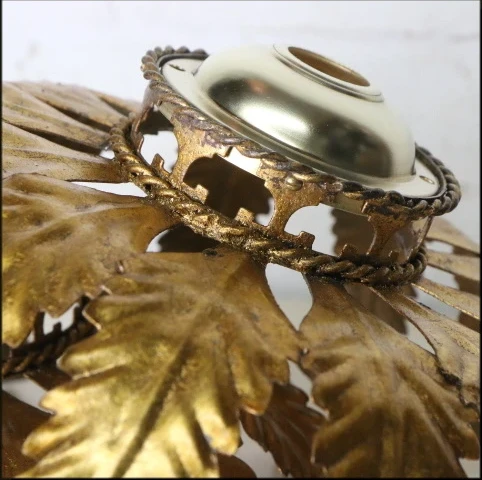
At the back of the fitting are remnants of a fitting strip, which has been roughly cut off for reasons unknown. The fitting has many old paint marks and, unfortunately, is heavily soiled with nicotine and smoke from years of use in a smoking environment. The first task is to carefully remove the remnants of the old fitting strip. The simple way of removing lightly welded pieces of sheet metal is by gripping with pliers and gently bending back and forth to weaken the weld. This worked a treat. Using power tools that generate heat is not recommended as there is a risk of damaging the all-important gilt finish.
The trouble with tobacco!
The next step is to remove the smell and tacky debris left behind from the cigarette-laden environment in which the light was used. Luckily, with metal items, smoking debris is easy to remove; it takes care and time, but it can be done. If this had been an unvarnished wooden fitting, it would have been ruined as prolonged exposure to tobacco smoke gets “in” the wood and cannot be removed.
This toleware fitting was soaked in warm soapy water, rinsed, and soaked again. After a few hours, the tobacco damage was gone, and the paint debris also loosened for easy removal. After the cleaning, the finish looked brighter, and the fitting was clean and ready to be converted.
Up Lighter or Down Lighter – Or a bit of both?
Fittings like these were mounted as both downlighters and uplighters. After assessing the fitting area, I decided to turn this fitting into a downlighter. The next step is to find a way of adding a fitting to this lovely old light. It needs something that doesn’t take away from the look but allows it to hang true and shine again. In any situation like this, I find it best to really take time and consider possibilities before charging in.
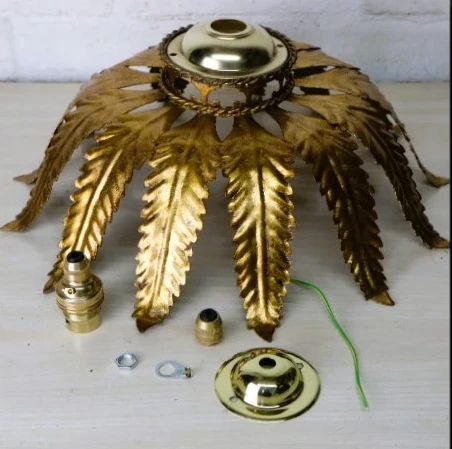
After careful measuring, I found a ceiling plate that was a good internal fit into the reticulated fitting rim of the toleware light. The plate I found needed its opening made larger from 1 Cm to 2.8 Cm, which would allow use with a UK BC22 brass bulb holder. This was achieved using a manual hole cutter.
Once this was done, the new fitting plate was carefully drilled and attached to the toleware using fine and small brass screws and nuts.
For fitting parts such as these, I use a company called Peter Willetts Lighting.
Peter is highly knowledgeable, and his website has hundreds of items that are hard to find anywhere else. You can find his website here – PETER WILLETTS
Rewiring your saved Antique lighting.
Rebuilding & Rewiring the Light – the Light was fitted with the best quality Earthed brass bulb holder from a UK company called S.Lilley and Sons. The bulb holder has a built-in brass cord grip that securely holds the wiring in place after fitting. The light was also matched with a simple brass ceiling plate that was fitted with a similar cord grip and an earth point. The wiring used was a quality cloth-covered 3-core type in an Antique gold finish. This cloth-covered wiring looks really good with the light and is sympathetic to the original design period of the Toleware fitting.
When rewiring any piece of lighting, make sure you follow your local guidelines, and if you are in any doubt, please make sure you get advice or input from a qualified person.

The finished light fitting, back in use after decades of neglect.
Despite the gilt finish of the light having various small marks and imperfections from age and use, the converted Toleware Light Fitting really shines in use. The internal matte finish provides a warm downlight which sets off well against the bright gilt exterior. The light produces an amazing shadow effect when used with a bare bulb. It casts leaf shadows across a space for an interesting and eye-catching lighting effect. The light could be used with a small glass shade if softening of the shadows was required.

Conclusion
It is very satisfying to see this old neglected piece of French (probably) lighting back in use, it is simply but well made and with care will last another 100 years.
This was a really enjoyable project, which took most of the time in thought, measuring, and planning.
Time spent: 8 Hours.
Parts Used.
Brass Ceiling Plate for conversion.
New Antique Gold cloth-covered three-core cable.
Sundries, Nuts & matching screws, and an Earth Tag for the ceiling plate
Pressed Brass ceiling plate
New quality brass bulb holder with built-in cord grip
I hope you have enjoyed reading this post. Please drop me a comment or suggestion. You can see some of my other refurbishment projects below.