Making a one-off Coastal Nautical Table Lamp.
As I write this the UK is currently in a Covid 19 Nationwide lock down. My usual sourcing places are shut, there are no auctions, no Antique fairs and shops and no markets. I wanted to get my teeth into a new project, something a bit different and unusual. During the lock down, the internet has been a great source of new stock and projects. A couple of weeks ago I was scrolling through eBay looking for some inspiration and I came across a reasonably priced vintage mid-century British coastal buoy. The buoy is made from heavy gauge metal with a thick welded seam and a hole through its centre for attaching to ropes and chains.
The buoy is large at 35 Cm across and would have been used near to the coast to attach small boats to. The buoy dates from the mid 20th Century around the 1950s. The photos provided by the eBay seller showed that the buoy was structurally sound but very dirty and having some fine surface corrosion across its surface, it was also clear from the photos that the buoy had some remnants of an Orange painted finish.
The Project.
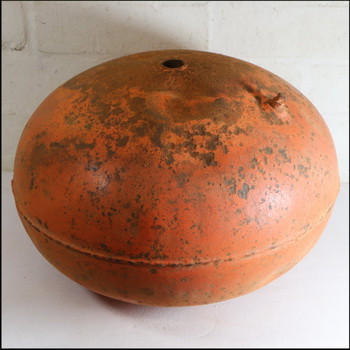
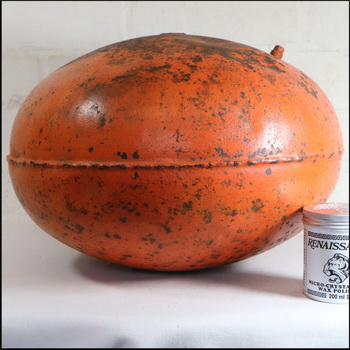
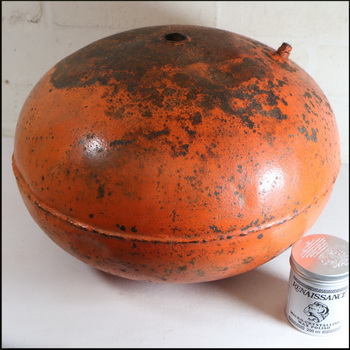
The buoy was delivered and was found in sound but a very dirty condition. After many years of use in a sea air coastal setting the elements had taken a toll on the finish, the buoy also had dents, scratches and marks from use but the look but had real appeal and the buoy was crying out to be put back into some type of life and use.

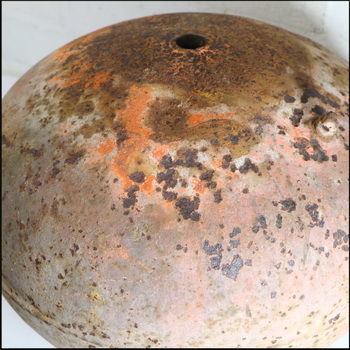
Here are some images of the buoy can as found. Despite the dirt and seemingly poor looking condition, this great piece of old British coastal history has great appeal and great potential as an upcycling project and I could see it as a large nautical themed table lamp.
Mounting the Buoy
The first thing to sort out was the mounting of the buoy, due to its shape the buoy would not sit straight so I decided to make a wooden base for the buoy to sit on. I have in stock a few large strips of heavy seasoned timber and I was delighted to find a piece that was just about perfect in size, the wood had nice grain but was plain enough not to take away from the hoped-for attractive finish of the buoy. Getting the base sorted out is an important first step in such a project and allows the building of the lamp to start from bottom to top. The wooden base was drilled with a 1.2 Cm hole to take a length of 1 Cm all thread tube which is a standard threaded tube used in lighting. The base was also drilled to one side for cable entry and the top of the base was gently drilled with a hole cutter to make a bedding point for the base of the buoy. Once the drilling was finished the base was oiled and given a coat of wax to protect the wood during the build of the new lamp.
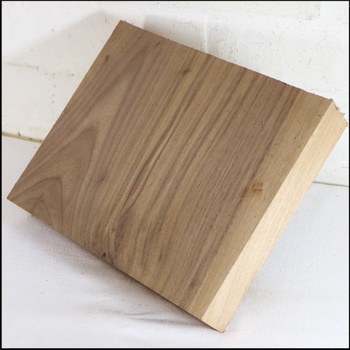
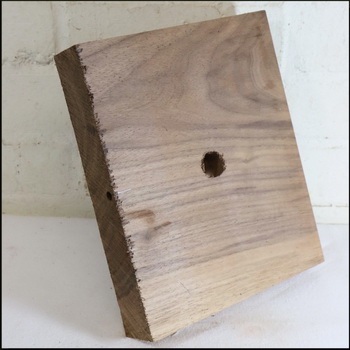
Here is the wooden base during its preparation.
Bringing new shine to the Buoy
The next step was to have a good look at the finish of the buoy. Using a face mask and a large lump of medium wire wool I spent an hour gently rubbing the surface to the buoy, very quickly the surface coatings of sea debris and general dirt started to come away. I was delighted to find that the Orange painted finish of the buoy was largely intact and spread across the whole surface of the buoy. The surface corrosion and pitted rusted surface also started to shine and added a used characterful appearance of the old metal buoy.
Here is the buoy after cleaning with wire wool.
Once wiped over to remove the remaining dust and surface dirt the finish of the buoy was sealed with two coats of a great product called Micro Crystalline Wax, this wax is a fantastic product that seals, protects and brings out colour and textures in a wide range of materials. With the wax applied the Orange finish of the buoy was transformed with the colour and textures popping from the metal surface of the buoy.
Here is the buoy after receiving two coats of Micro Crystalline.
Putting the lamp together
With the wooden base and the buoy having an initial finish, it was time to start building the lamp. The buoy was mounted onto the base with a long length of all-thread tube. I wanted to have the bulb holder mounted high enough from the surface of the buoy to allow clearance if the lamp was ever used with a lampshade, I wanted to make sure the full profile of the buoy would be visible. A lamp like this also lends itself for use as a bare bulb lamp, especially when used with a modern low energy antique style globe bulb. The threaded tube was cut back and the lamp was fitted with an aged brass dome to cover nut and washer fittings and was fitted with aged brass tubing.
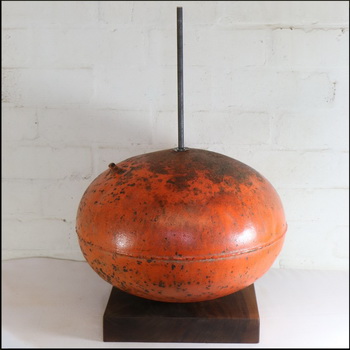
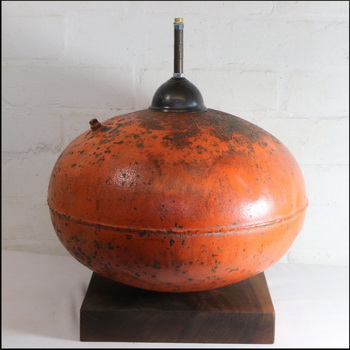
Here are the buoy and base starting to look like a table lamp.
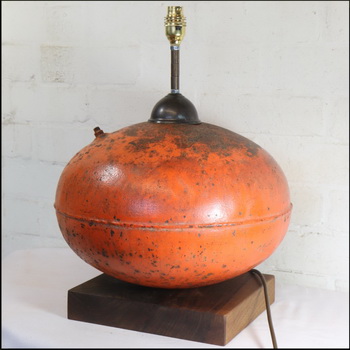
Wiring up the new light.
The wiring for this light was straightforward, new components were needed, a Brass earthed BC switched Bayonet bulb holder, a brass reducing thread and a few wiring sundries.All metal wiring entry and exit points were protected with small but important 10 mm grommets, these are small but crucial items that will protect your cable from sharp edges. A cable-stay was also employed inside the wooden base to avoid cable pulling.
Note – If you are carrying out a rewiring project like this there are a few points to remember and to incorporate into your project.
Make sure you use components that meet the safety standards in your country. In the UK earthed (grounded) wiring must be used with metal components. Make sure the wiring route avoids sharp edges and use plastic grommets or sheathing for cable protection. After the wiring was completed the buoy table lamp was given a final wipe over and was given a final coat of Micro Crystalline.
Here is the lamp with electrical fittings and wiring finished.
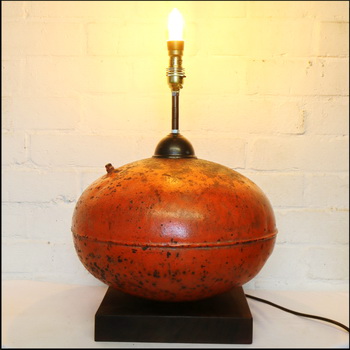
In use, the character of the old coastal buoy came to life. The dents, rust and finish of the buoy add an interesting character and eye-catching look to this nautical themed lamp. The old forgotten buoy is now reborn as a nautical table or desk lamp. Ideally suited to a man cave, coastal home, café or restaurant. Converting this fabulous old buoy into a lamp was very rewarding, the careful surface finish renovation paid dividends in its final appearance. I would always encourage anyone to have a go at a project like this, there is nothing like getting your hands dirty and having the satisfaction of bringing new life to an old and forgotten piece of British history.
Conclusion
I hope you like this upcycle project, I am very pleased with the result and the way the buoy had become such an interesting, unique and one-off lamp.
Materials – Wire wool. WD40. Cleaning and Finishing Wax. Earthed Wiring. Earthed Brass switched bulb holder. 10 mm Threaded tube. Aged brass tubing and dome. Various wiring sundries.
Time Spent on the lamp – 5 Hours.
I often have several Vintage Industrial items for sale in my eBay shop here – Hertfordshire Lighting and Design
If you fancy owning a piece of original Vintage industrial lighting I would recommend you to view the offering at the wonderful Vinterior website. You can view the Vinterior website HERE.
I would love to hear from anyone who has performed a similar restoration project; it’s always great to share ideas with other people.
If you have any questions or need advice on any item of Vintage lighting please contact me and I will do my best to help.
Michael Adkins. michael@hertfordshire-lighting.com