Upcycling is great.
Not only is It good to breathe new life into an old and unwanted item but it is also challenging, fun and very rewarding.
The Internet is full of great examples which show how everyday people have put thought and time into upcycling all sorts of items to produce unusual, unique and environmentally friendly products.
I love to upcycle, reuse and save old items. My specialist area is lighting and I really enjoy making unusual table lamps which are always unique, very different and provide a new lease of life to an item that is often old, neglected and forgotten.
Here is a brief rundown and the story of a very unusual table lamp.
Antique Wooden “Bits”
I am lucky to have some great contacts that I have built up over my many years working with vintage lighting, antique dealers and house clearance companies.
A few months ago I received a call from a contact who had cleared an old garage which was full of neglected items ready for the local recycling centre. He told me he had a bundle of “Antique Wooden Bits” that I may be interested in so I went to investigate. On visiting the yard I was presented with a bundle of very old Antique wooden square box sections which turned out to be the wooden casings from an Antique pipe organ.
The parts had been put into storage many years ago after a church organ refurbishment, many had been used for general timber work but the bundle I purchased had been left untouched.
I did a bit of research and discovered that the old organ parts dated to the later part of the 19th Century. The construction of the parts was basic but strong, the finish was also basic and the timber had many marks and dents from construction and use, despite the issues with these organ pipe holders there was great appeal to the old parts and they presented a great challenge for upcycling into unusual table lamps. These wooden parts are called organ Flues.

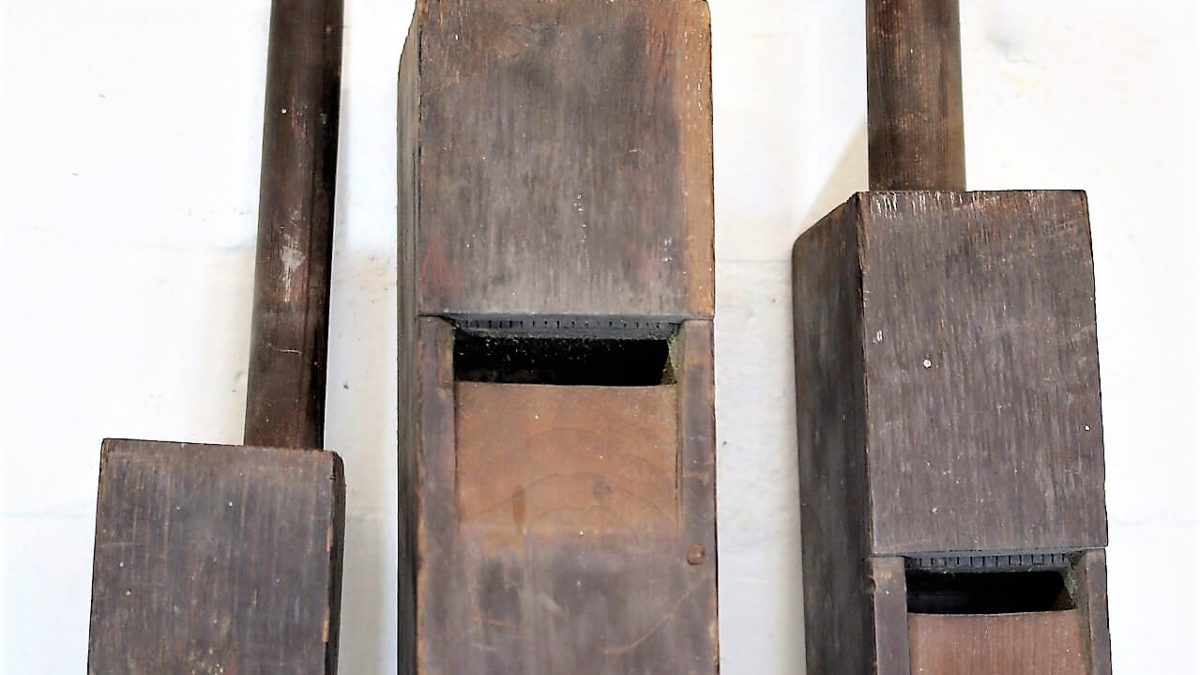
Here are three of the Antique Organ Pipe flues shown as found, long, grubby but solid and sound.
 At the top the flues have interesting vent openings and wooden tuning toes which add great character to the pieces.
The wood used in the construction of these old organ flues is surprisingly lightweight so I had an idea to fix the three flues together and fit them to a base so that the finished lamp would have stability in use; this important stability was not offered by the weight and sectional area of the flues alone.
Measuring and Sawing.
This is where the fun starts and when the early thoughts and ideas start to become reality. I decided on a good height for the new lamp and had an idea to set the three flues at different heights to add an extra element of randomness to the finished lamp.


Going in stages and using a bit of thought.
Over years of upcycling and making lighting I have learned that at this stage the most important thing to do is to exercise the Grey matter, stop, think and plan.
I realised with this lamp that the next stage was to assemble the three flues together and to fix into place the electrical wiring route, then the wiring would need to be run and secured before the final fixing of the lamp body to the new lamp base; this all sounds quite obvious but you would be amazed how many times I have gone charging to the final stages of assembly before realising that an important step had been missed earlier in the project.


 The wiring is now run and the wood has been given a preliminary clean using natural oils.

The all important finish.
The next stage was to fix the wooden base to the new lamp, once the lamp body and base are together the old wood can be properly finished. These old flues were full of marks, dents and bumps from life and Antique age. These marks just add to the unique interest of the lamp so no attempt was made to remove or hide them. The lamp was finished with a natural stained beeswax which is wonderful for bringing out grain, marks and dents in old wood. The dark stain provided the lamp with a richness of colour and highlighted the history of these old organ parts.
 A close up of the new finish showing how the grain variation and signs of life became a feature of the new lamp.


The finished lamp. Views from the side, front and back.
Conclusion
I am really happy with the finished lamp. The new lamp bears the marks of the long life and history of the original items. There is great satisfaction from making a new item from something that was destined for the material recycling centre. The end result is something truly unique; in this case a very unusual table lamp.
I would love to hear from anyone who has performed a similar upcyle and re purpose project; its always great to share ideas with other people.
You will find a few up cycled lighting projects and other interesting items HERE.
If you have any questions or need advice on any item of Vintage lighting please contact me and I will do my best to help.
Michael Adkins. michael@hertfordshire-lighting.com
