The pleasure and fun of making a true “one-off” table lamp.
There is a huge interest today in providing new life to old and unloved items. Recycling, repurposing, upcycling; whatever your preferred term there is something really satisfying and fun about breathing new life into an old item that could quite easily find its way into a dump or landfill site.
The popular pastime of repurposing is covered on TV programmes, the internet and in specialist publications.
What about making a table lamp? Homemade table lamps are far more common these days and there are some exceptional examples for sale on auction websites and in specialist Antique and Vintage retailers.
How to make a table lamp. A beginners guide.
Let’s assume that you have an item at home that is a bit neglected and unused but still has a certain charm and is of a decent decorative standard, something that with a little thought and time could make an interesting and unique homemade table lamp. Assuming you are a beginner you really want to choose something simple and straight forward, just to get you into the swing of things!
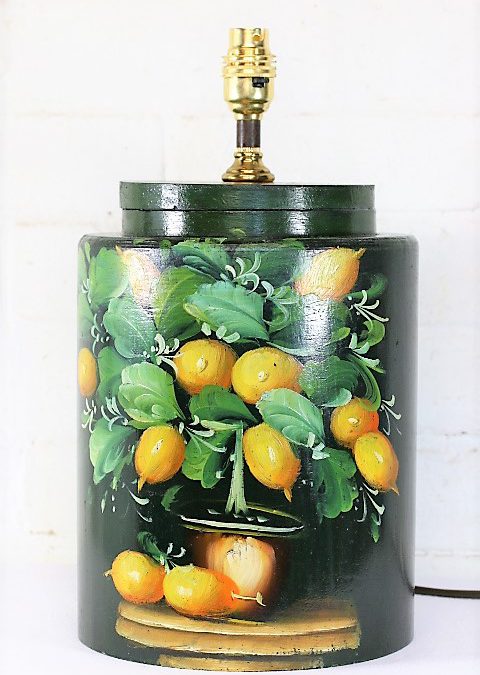
Here is the subject of this post.


This is a rather nice vintage bentwood lidded cylinder, with its original matching lid. The cylinder is hand-painted and is made in an Antique style, the cylinder is only vintage in age and dates to approx the 1980s. It was probably made in south-east Asia and was designed and painted to look Antique European.
There is nothing wrong with this cylinder but it is unloved and unused, it needs a new purpose and a new lease of life. This cylinder would make a great 1st project as it has a simple construction and is large enough for easy access and handling during conversion.
Here are some of the basic things to consider when choosing an item for converting to a table lamp.
• Wiring – Your old item will have to have a clear path for the new electric cable.
• Stability – Will the item stand well and be stable with a lampshade fitted.
• New Components – Wiring. Bulb Holder. Switch. Sundries such as threaded tube and small nuts and washers. Grommets and a cable stay.
• Decoration – Will your items decorative features be enhanced by use with lighting.
This interesting old bentwood cylinder ticks all the boxes so let’s go through the fairly simple process of turning it into a unique and one-off homemade table lamp.
Wiring path on this cylinder is simple and straightforward The decorations are all on one side so the cable entry will be on the back low down and the exit/bulb holder point will be on the lid.
 Here is the cylinder drilled with 10mm diameter holes cable fittings.

Tip – If you are drilling a hole in an item made from thin material liable to split then use a slow drill speed and drill from the decorated side as this can happen on the other side of your surface.

Stability. This bentwood cylinder has a large diameter footprint so is stable, it is however quite light and thin so I intend to add a metal plate fixed to the inside of the lid just to add a bit more meat to the lamp. You can also use a cup of sand carefully sealed inside a strong polythene bag which is a method that has been used for decades by Chinese and Oriental lamp manufacturers.
New components. This cylinder lamp will need two lengths of 10mm threaded tube, a few 10mm nuts and washers, a brass cup and tube for mounting the bulb holder onto. All of these items can be found online and in good electrical hardware retailers. Tip – When you fit your new cable entry and exit points try and keep it neat, a washer that covers the entry makes such a difference to the overall look of the project, simple neat things like this make all the difference.

Once the new components were fitted into place I added an important part of the new set up which is plastic or rubber grommets, these small but important components stop the outer of the electrical cable from rubbing against sharp edges.
The cable was passed thought the new entry points and a bulb holder was fitted. Here in the UK, we use earthed (grounded) wiring for metal fittings. When you add your wiring please look up your standards online and make sure you use new and industry-standard components. If you are ever in doubt as a qualified electrician.
Once the electrical components were fitted the lid was securely fixed in place using strong modern epoxy glue. Before fixing a cable-stay was fitted inside the cylinder which prevents the cable being pulled from the bulb holder in the event of a hard pull, this is another important feature that you should build into any lamp you make.
Tip – Large cable ties make great and inexpensive cable stays.
Finally, the new lamp was tested and cleaned, if you are using an older item don’t try and hide signs of life such as chipped paint and small dents as these become features on your new lamp.
This lamp was given a final clean using the wonderful micro-crystalline infused Renaissance wax which is an amazing product as used by the British Museum. A single coat of this wax cleans and revies the texture and colour of the old wooden cylinder.
 The finished and cleaned bentwood cylinder table lamp.


When alight and in use, the decorations of the lamp and the really shine. It brings me great pleasure and is great fun to breath new life into an old neglected item.
It would now make a great mood lighting lamp ideal for a corner in a country setting.
I hope that you have enjoyed reading my post and that this basic project may encourage you to “go green” and give life to a Vintage or Antique item.
Materials – Wood cleaning wax. Earthed Wiring. Earthed brass switched bulb holder. Brass fittings. Threaded tubes, nuts and washers. Cable Tie.
Time Spent on the lamp – 1.5 Hours.
I would love to hear from anyone who has performed a similar homemade project; it’s always great to share ideas with other people.
If you have any questions or need advice on any item of Vintage lighting please contact me and I will do my best to help.
Michael Adkins. michael@hertfordshire-lighting.com